
Tech
FXR V.O.E.S.
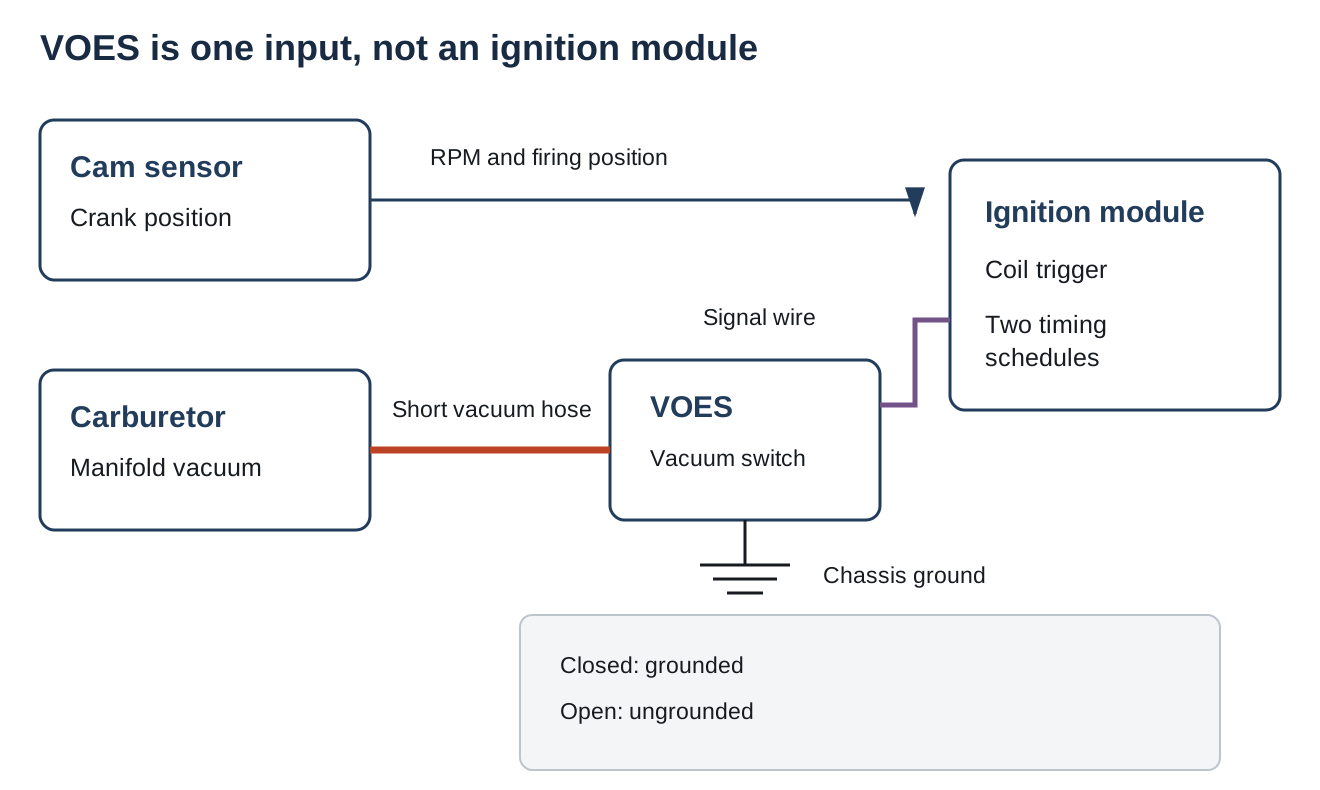
The plain answer: V.O.E.S. means vacuum-operated electric switch. On a carbureted FXR it senses engine load through intake vacuum and tells the ignition module which of two advance schedules to use. Light cruise means more vacuum, a grounded switch and more advance. Acceleration and heavier load mean less vacuum, an open switch and less advance.
It does not make the spark, measure crank position or continuously turn a timing knob. The cam sensor tells the module when the engine is turning. VOES adds context: how hard is this engine working at that rpm?
Most stock FXRs have one. The 1982 and 1983 Shovelheads are the exception. And no, going single-fire does not force you to remove it.
Why vacuum helps pick timing
At the same rpm, your FXR can be loafing along a level road or pulling hard up a hill. A timing schedule based only on rpm cannot tell those jobs apart. Manifold vacuum gives the ignition a simple second piece of information.
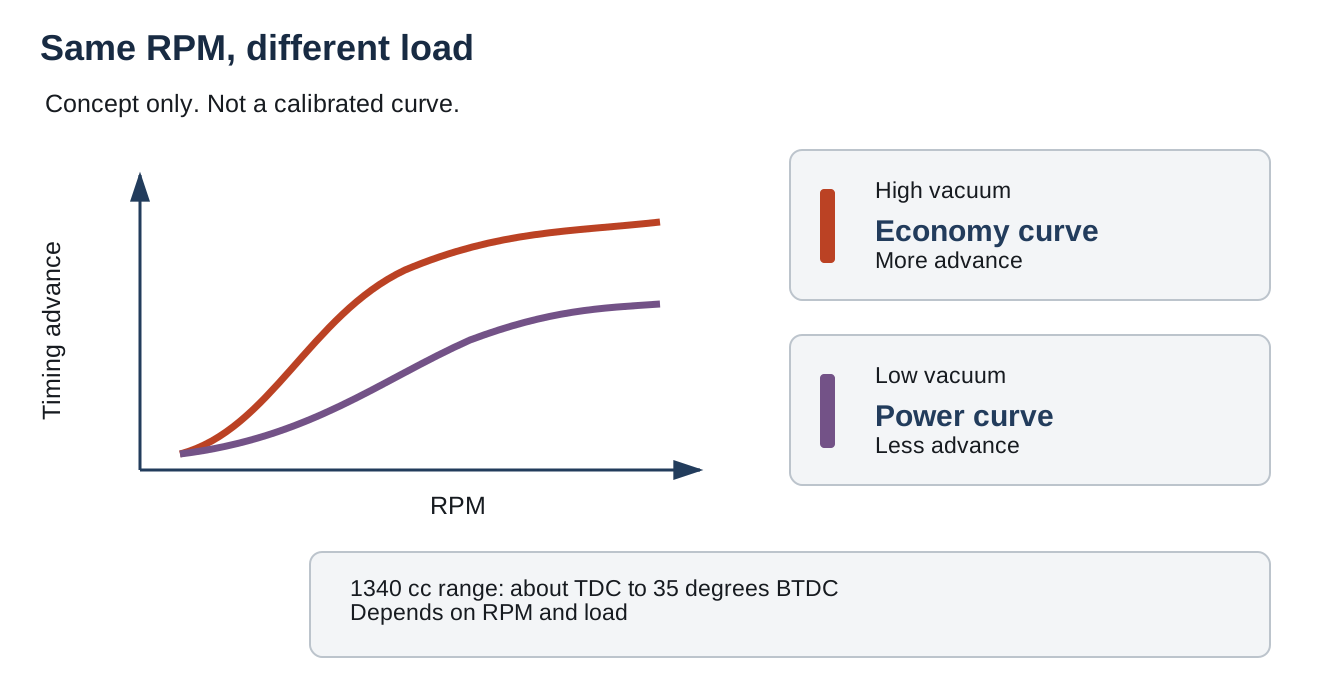
Harley called the two schedules:
| Engine state | Intake vacuum | VOES input | Ignition schedule |
|---|---|---|---|
| Light or no load | Higher | Closed to ground | More advanced Economy Curve |
| Load or heavy load | Lower | Open, not completing ground | Less advanced Power Curve |
More advance at light load can improve part-throttle response and fuel use. Under higher cylinder pressure, less advance leaves more margin against spark knock, also called pinging. The Power Curve is not evidence of a broken ignition and is not meant as a poor-power curve. It is the appropriate conservative schedule for that load.
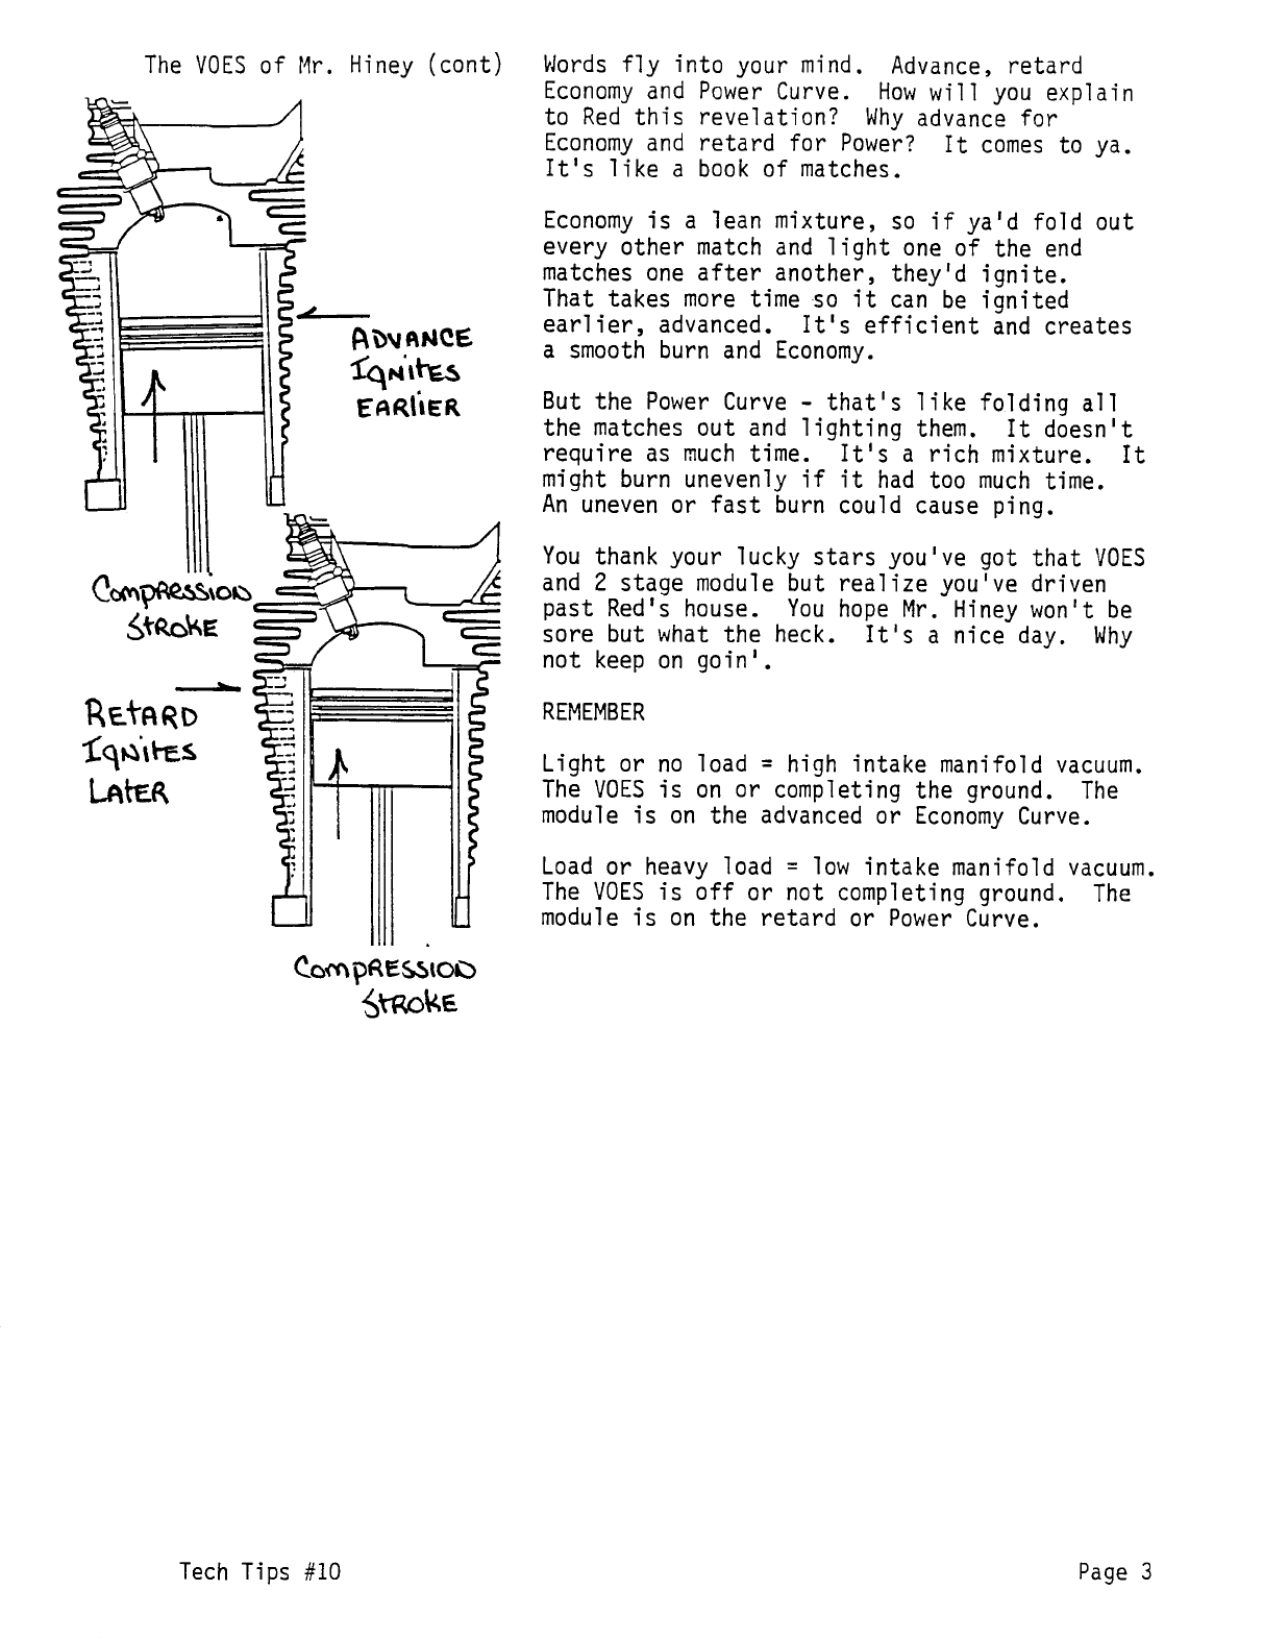
Harley's own explanation is unusually direct. In its May 1987 Technical Tips No. 10, page 3, it says:
"Light or no load = high intake manifold vacuum. The VOES is on or completing the ground. The module is on the advanced or Economy Curve."
And:
"Load or heavy load = low intake manifold vacuum. The VOES is off or not completing ground. The module is on the retard or Power Curve."
What Harley's factory electrical book says
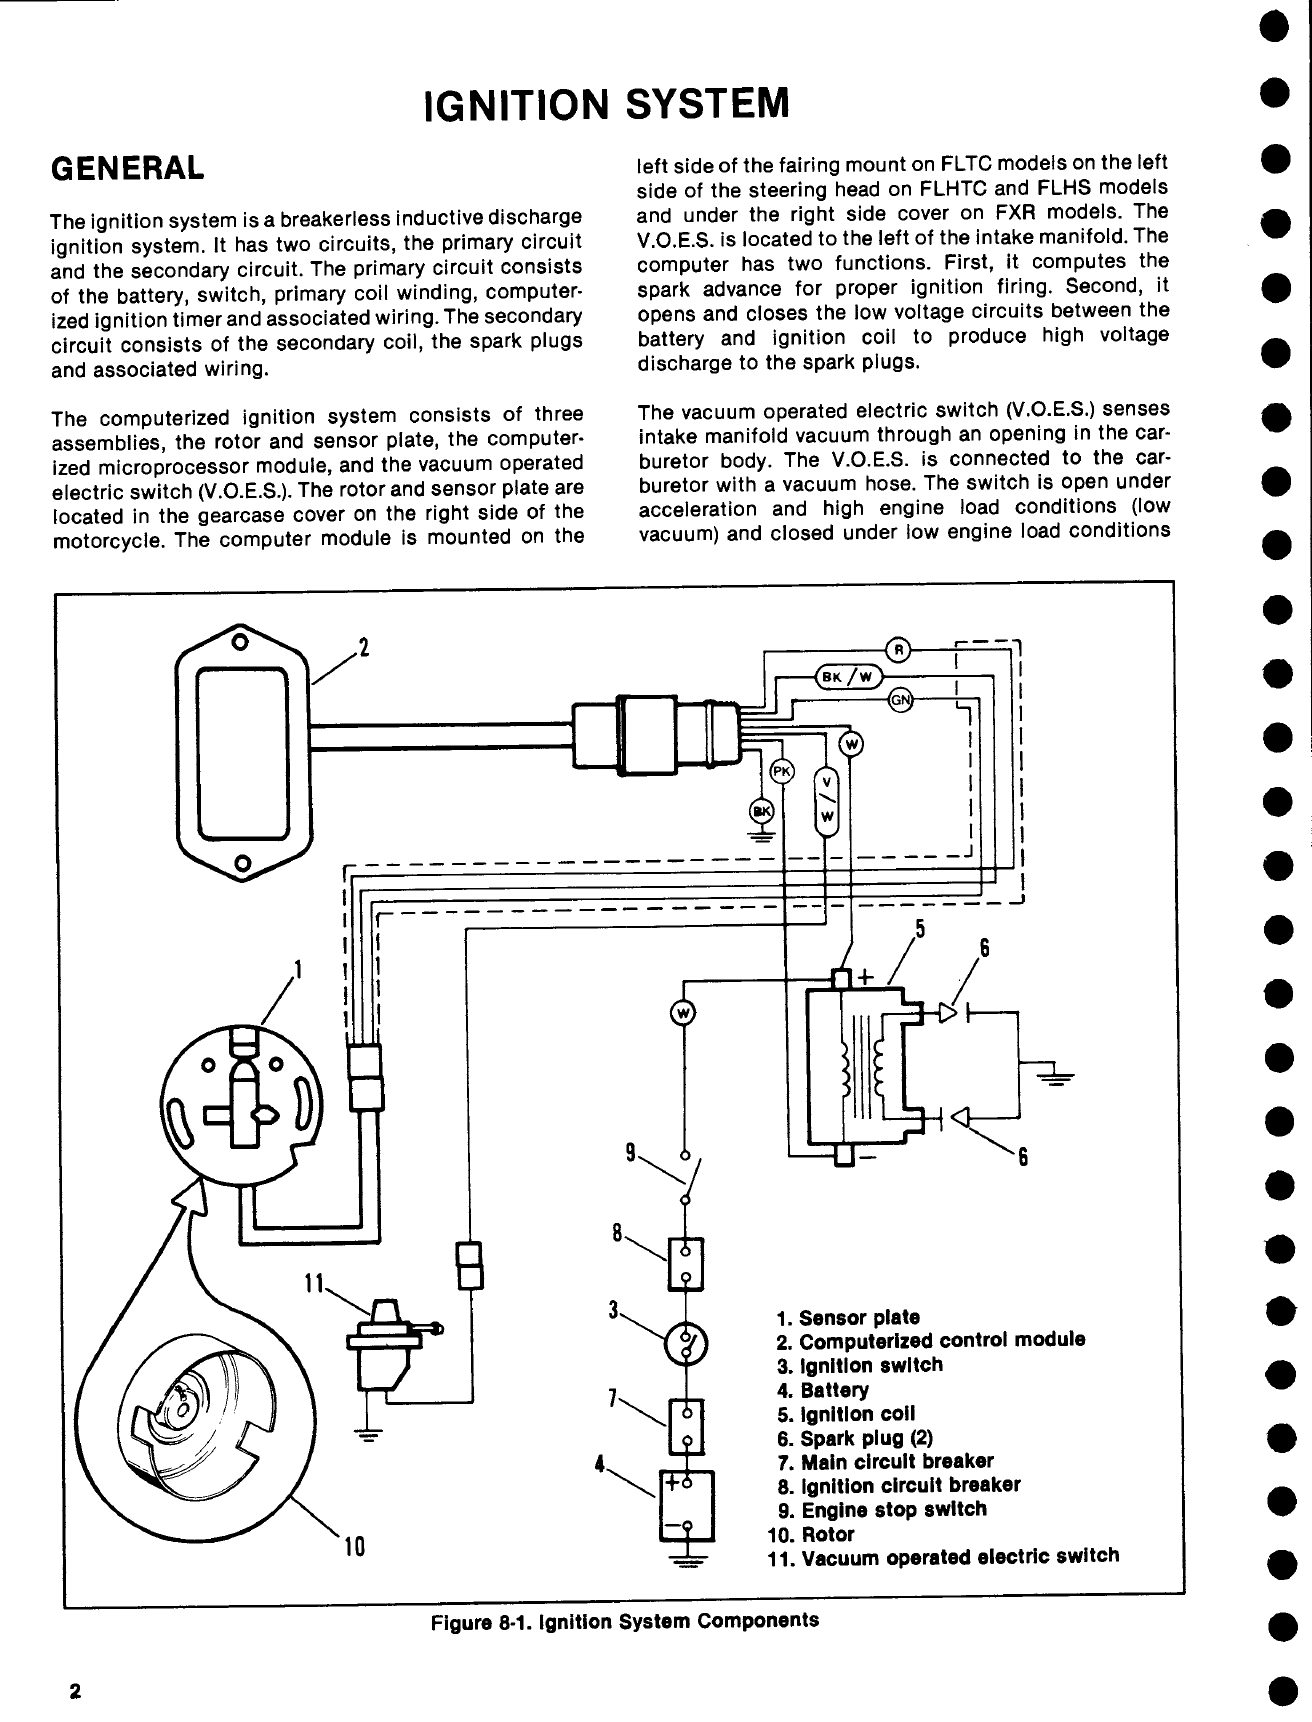
Harley's 99948-92, Wiring Diagrams & Electrical Troubleshooting Guide, 1991 and 1992 All Models, Ignition System, page 2, puts the FXR module under the right side cover, and the VOES to the left of the intake manifold. It says vacuum comes through an opening in the carburetor:
"The switch is open under acceleration and high engine load conditions (low vacuum) and closed under low engine load conditions."
Page 3 describes the high-vacuum curve as providing maximum advance for economy and performance, and the low-vacuum curve as minimizing spark knock. It says timing on the 1340cc system varies approximately from TDC to 35 degrees BTDC with rpm and load. That is the system's described operating range, not an instruction to statically set every bike to 35 degrees.
Where it is and how it is wired
Think of two separate paths, one pneumatic and one electrical:
- The short hose runs from the designated carburetor/intake-vacuum port to the switch's vacuum nipple. It does not deliver fuel or crankcase venting.
- One electrical side of the switch grounds to the motorcycle. The other is the module's vacuum-switch signal lead.
- The Evo module sits behind the right frame side cover; the factory module installation sheet uses that wording for FXR and FXRP.
The wire names changed with the harness. Harley J00068, page 2, Figure 2 identifies early original-module violet as "Vacuum-operated electric switch (V.O.E.S.)". It also puts the FXR/FXRP module behind the right frame side cover. On the later seven-socket arrangement, the factory 1994 FXR schematic, 99948-94 WD-47, labels the switch signal V/W, violet/white, with BK, black, grounded at the other side. Verify the year-specific diagram instead of moving a wire because an internet chart says violet.
An early-to-new module adapter, 32408-90, joins the older individual-lead setup to a newer seven-socket replacement module. Some Harley installation sheets broadly call for that adapter on 1991-and-later work because the text covers early harnesses too. The actual connector on the bike, not a sentence taken out of context, decides whether an adapter is needed.
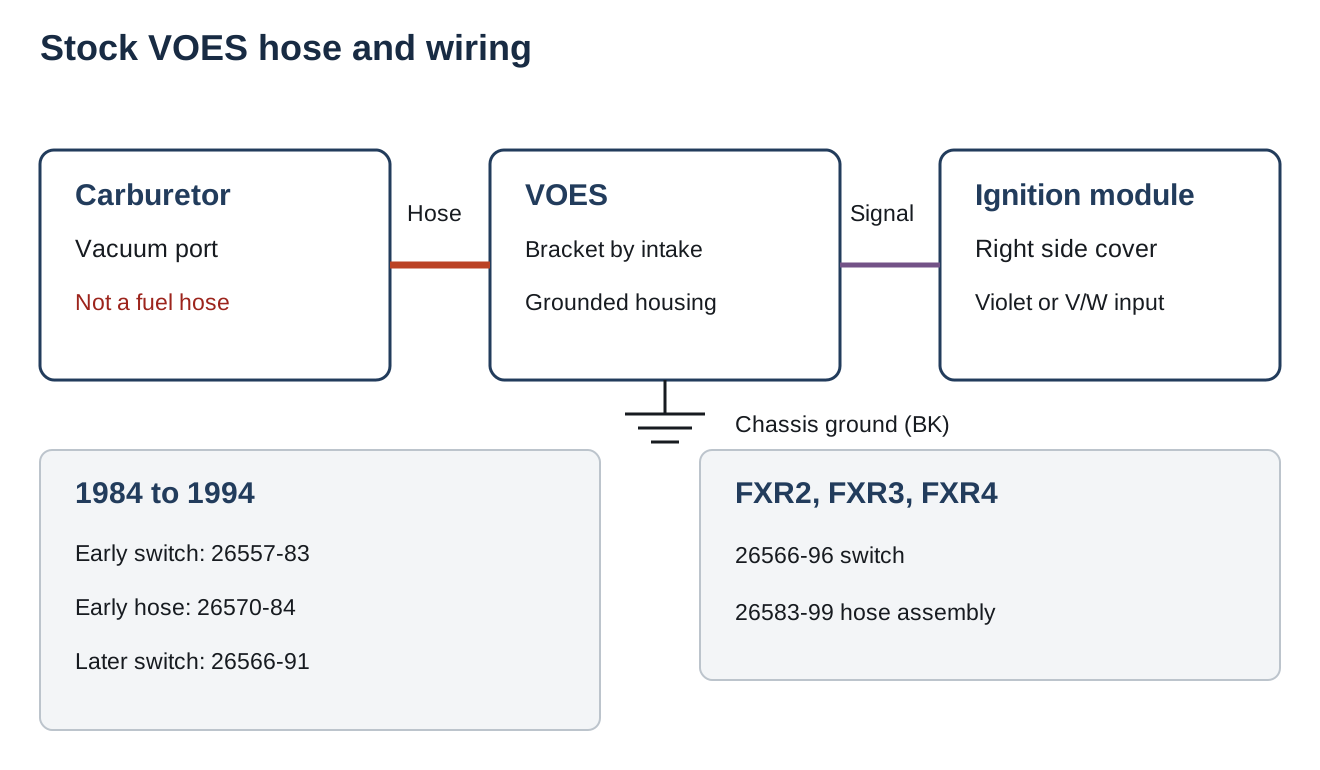
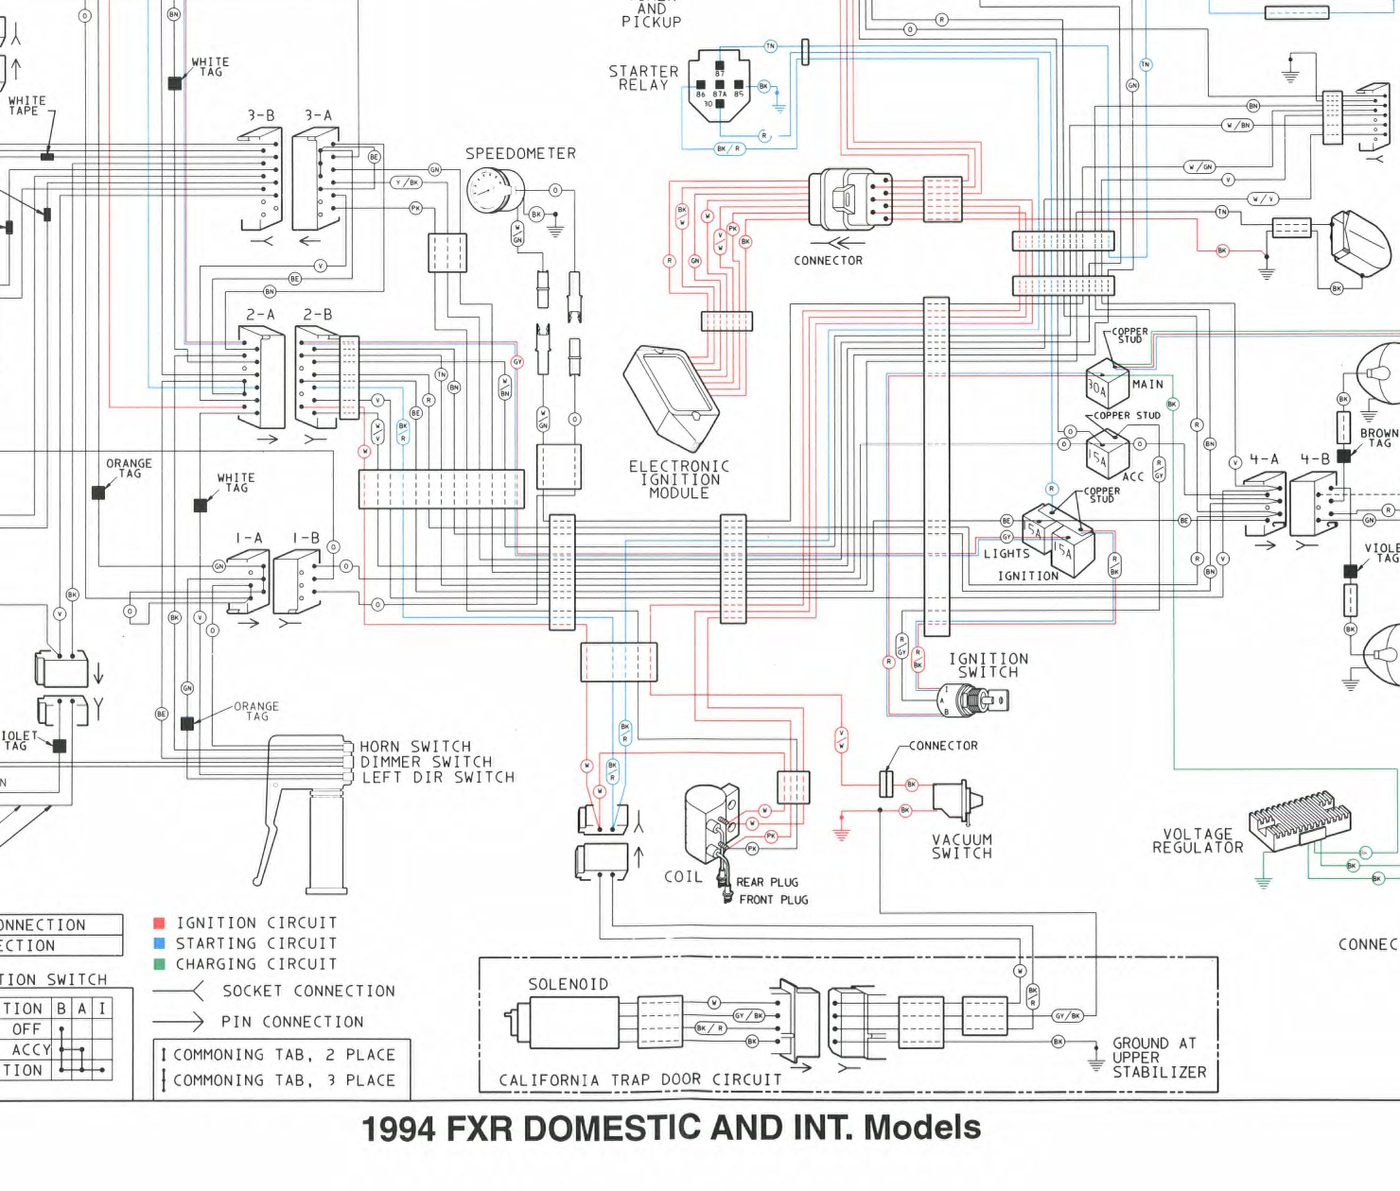
Factory switch and hose numbers
These are numbers from the actual factory parts books, not a generic switch supposedly suited to everything.
| Factory application | Switch | Hose and relevant hardware | Catalog proof |
|---|---|---|---|
| 1984 to 1990 civilian FXR family; late 1984 to 1990 FXRP uses the same switch | 26557-83 | 26570-84, 3/16-inch I.D. black bulk civilian hose, cut to length; verify the early police hose separately | 99439-86A, Carburetor figure page 20, item 9 switch on table page 21, and item 53 hose in the full book on page 17. 99450-90A, page 11 item 49 and page 31; 1990 table item 60. |
| 1991 to 1994 civilian FXR family and 1991 to 1994 FXRP | 26566-91 | 26563-91A; later police table also lists 26563-94 harness | 99450-92A, Carburetor (1 of 4), pages 40 and 41, item 4 switch and item 14 hose. 99450-94B, Carburetor (1 of 3), item 4. Police 99545-92A and 99545-94A, Carburetor (1 of 3), item 4. |
| 1999 FXR2, FXR3 and 2000 FXR4 | 26566-96 with connector assembly | 26583-99 vacuum hose assembly | Matching factory 99426-99A, 99427-99A and 99429-00A, Cam Position Sensor & Vacuum Switch, items 6 and 7. |
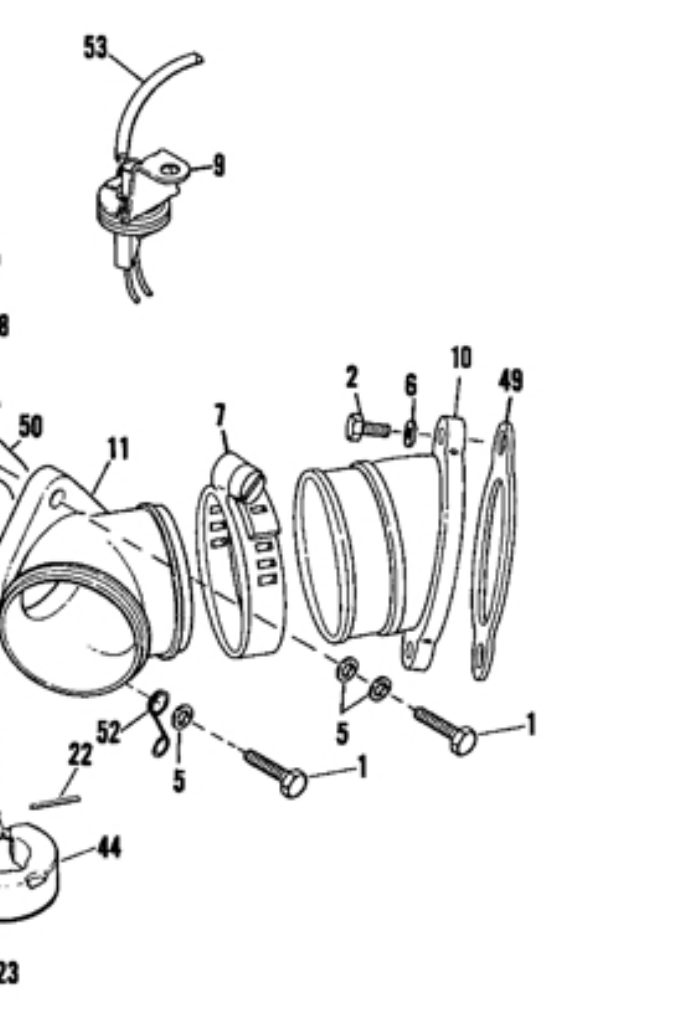
The early police fiche verifies the switch, item 38, but not the complete hose assembly. Do not silently transfer the civilian hose entry to an early FXRP restoration.
Harley's catalogs can differ in printed part revision from today's supersession catalog. For an original restoration or a diagnosis on a particular bike, match the appropriate year's table before ordering. Do not infer calibration by seeing the same switch family on another model.
Which FXRs have VOES?
Yes means fitted by the factory. A forty-year-old bike can have any ignition today. Every factory FXR here was carbureted and dual-fire; none was factory EFI or single-fire. The change to Evo electronics in 1984 brought the stock pair of electronically selected advance schedules and VOES.
| Year | Models in that year's factory coverage | Factory VOES | Ignition context and primary check |
|---|---|---|---|
| 1982 | FXR, FXRS | No | Shovelhead, earlier electronic-trigger system and trigger rotor 32401-80; centrifugal/mechanical advance family, not breaker points. Year-matched ignition fiche has no VOES unit. |
| 1983 | FXR, FXRS, FXRT | No | Same early electronic, not the later Evo two-schedule ignition module. |
| 1984 | FXRS, FXRT, FXRDG | Yes | Evo and 26557-83. 99439-86A pages 20 and 21. No base FXR this year. |
| 1985 | FXRS, FXRT, FXRC, FXRS-SP option | Yes | All-models row in 99439-86A. |
| 1986 | FXR, FXRS, FXRT, FXRD, FXRC | Yes | 26557-83; module 32405-88; sensor 32400-80A on 99439-86A page 29. |
| 1987 | FXR, FXRS, FXRT, FXLR, FXRS-SP | Yes | 26557-83 for all FXR variants, 99450-90A page 11. |
| 1988 | FXR, FXRS, FXRT, FXLR, FXRS-SP | Yes | Same parts-book coverage. |
| 1989 | FXR, FXRS, FXRT, FXLR, FXRS-SP | Yes | New CV carburetors in 1989, but the vacuum switch remains. A Convertible introduction is sometimes claimed for 1989; if yours differs by market/date, check its fiche. |
| 1990 | Above, plus FXRS-CONV / Convertible | Yes | 26557-83, 99450-90A. |
| 1991 | FXR, FXRS, FXRT, FXLR, FXRS-SP, FXRS-CONV | Yes | 26566-91, 26563-91A; 99450-92A. Seven-socket module harness arrives, retaining VOES. |
| 1992 | Same standard models | Yes | Same parts catalog. 99948-92 gives each variant's model-specific diagram with a switch. |
| 1993 | FXR, FXLR, FXRS-SP, FXRS-CONV | Yes | 26566-91, 99450-94B. Base FXRS and FXRT are no longer listed. |
| 1994 | Same standard models | Yes | Same switch family; WD-47 confirms the circuit. |
| 1995 to 1998 | No FXR production | Not applicable | Regular FXR line ended after 1994. |
| 1999 | FXR2, FXR3 | Yes | 26566-96 and 26583-99, in matching CVO factory catalogs. |
| 2000 | FXR4 | Yes | Same CVO switch and hose part family, in 99429-00A. |
| 2001 and later | No FXR production | Not applicable | No factory FXR model. |
The 1984 to 1986 civilian catalog's "All Models" rows include the small-run FXRDG, FXRD and FXRC where the model-year list calls for them, so an unusual badge is not a reason to discard its switch.
The police FXRP deserves its own row
| Years | Factory VOES | What is verified |
|---|---|---|
| 1984 to 1990 FXRP | Yes | Harley's own installation sheet J01814 covers 1984-and-later FXRP Evo replacement module 32419-91A, and its early wiring table assigns violet to VOES. The FXRP-specific factory fiche identifies item 38, 26557-83 VACUUM SWITCH, for late 1984 through 1990 FXRP, including the 1984 and 1990 entries. |
| 1991 to 1994 FXRP | Yes | 99545-92A and 99545-94A, Carburetor item 4, specify 26566-91. The 1991 book specifies module 32419-91A, not the ordinary FXR replacement. |
Police motorcycles used a distinct module application. "Use the correct police module" is not the same as "the police bike has no VOES".
Dual-fire versus single-fire
The factory book explains dual-fire plainly: one ignition coil fires both spark plugs at the same time. One spark ignites a compression charge; the other is a wasted spark on the other cylinder's non-compression stroke. Both continue to receive a spark on every module trigger. The coil's two high-tension towers are why the factory diagrams name both Front Plug and Rear Plug.
Single-fire adds independently controlled coil primary paths and fires each cylinder only on its compression stroke. There is no intake-stroke spark on the opposite cylinder.
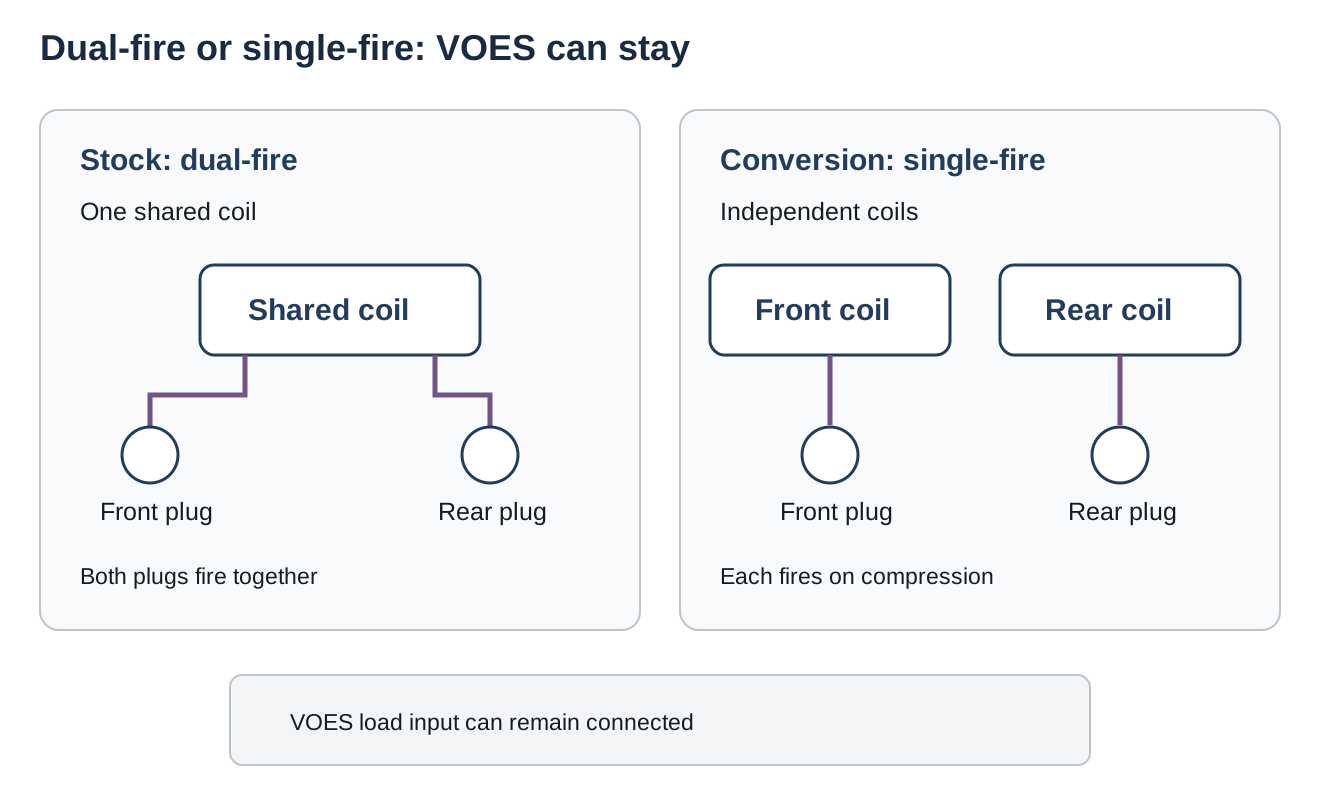
Daytona Twin Tec's Evo FAQ explains the relevant Harley V-twin event. When the front cylinder fires on compression, the rear is on intake. In some conditions the wasted spark can ignite a combustible intake charge and pop through the carburetor. A long-duration cam or mixture problem can contribute. Single-fire removes that particular spark event, which is why some conversions improve carburetor backfire and idle.
That does not mean a single-fire conversion cures every cough. Mikuni's HSR42/45/48 Tuning Manual, pages 8 to 9 and 13 to 14, also names cold running, early-opening/late-closing cam timing, some exhaust designs and late accelerator-pump action as backfire contributors. Air leaks and pilot-circuit problems can spoil idle independently. Diagnose the complete engine rather than replacing ignition hardware by rote.
VOES and single-fire solve different problems. The first supplies load information. The second controls when and to which cylinder the spark goes. A conversion may change both under one new ignition package, but neither change inherently requires the other.
Why do tuners talk about bypassing VOES?
A universal bypass instruction is not supported by the manufacturers' own instructions.
Dynatek's Dyna 2000i installation sheet 2801103 Rev. C tells you to connect its violet/purple vacuum wire during both dual-fire and single-fire installation. Its normal-VOES mode keeps a high-vacuum curve for light load. Twin Tec likewise recommends retaining or replacing the switch rather than deleting it.
Here are the real choices, using the Dyna 2000i in normal VOES mode as an example:
| Intentional setup | VOES wire state | Consequence |
|---|---|---|
| Retain load response | Connected to the switch | High vacuum brings advance in sooner; low vacuum leaves more advance margin |
| Fixed quicker advance for a racing setup | Permanently grounded | Faster/quicker advance curve, similar to the chosen mechanical-advance behavior |
| Fixed slower curve for heavy bikes or detonation-prone builds | Left unconnected | Advance always follows the slower rpm curve |
| Dedicated nitrous or turbo retard input | Grounded by its own switch or relay, not by VOES | On this selected retard mode, grounding causes retard, not normal Economy advance |
That last case is why a casual "ground the VOES wire" internet tip is dangerous. A wire's meaning depends on module brand, mode and generation. Dynatek explicitly warns that excessive advance can cause pinging and hard starting.
A tuner may therefore fix an ignition in one curve for a racing engine, simplify a custom bike's wiring, address unusual cam-vacuum behavior, or replace a two-state switch with a MAP-based programmable map. Those are deliberate engineering decisions. Building a new timing map around manifold pressure is not the same as just disconnecting the switch.
For a mostly stock street FXR with a functioning carburetor and intake, starting with a connected VOES is the conservative choice. Twin Tec cites idle stability and cruise economy. It also warns that a missing or nonfunctional switch may increase heat because low-load efficiency falls. That is the ignition manufacturer's design rationale, not proof that every FXR will run hot or show the same fuel-economy change.
What fails, and what the bike may do
Usually too little advance at low load
A hose cracked enough to lose vacuum, a blocked or disconnected hose, an open signal lead or a switch that fails open can remove light-load advance. In the stock and Dynatek-normal control logic, that biases the system toward the low-vacuum/Power schedule.
You might notice worse economy, reduced crispness or weaker idle response, not necessarily a total failure to run. If an unplugged switch made a bike feel crisper in a particular case, that is not a general tuning rule: compare timing, mixture, carburetor and cam state before assigning credit.
Possibly too much advance under load
A shorted signal, improper permanently grounded wire or wrong switch state can leave the advanced schedule selected when load rises. This is the more concerning direction because it can increase the risk of pinging and detonation. Stop using heavy throttle on a knocking engine until the true cause is found. Continued knock, hot starting trouble or kickback are not harmless little quirks.
Leak or diaphragm symptoms require circuit testing, not a guess. Vacuum loss commonly biases toward no light-load advance; an electrical short biases toward a grounded input. The physical and electrical state of an individual failed unit are what matter, not the fact it "failed".
Other things that mimic a bad switch
- Intake air leaks, incorrect pilot mixture, blocked carb passage or an incorrect vacuum port.
- Wrong base or dynamic timing, incorrect module mode or incompatibility with the coil.
- Bad battery connections, corroded ground, loose sensor connectors or a damaged harness.
- Exhaust popping due to air leaks or open exhausts, which is not carburetor backfire.
- A performance cam with low idle and cruise vacuum, making a stock switch threshold a poor match for that build.
A VOES failure by itself normally changes curve selection, not the cam-triggered spark signal. Harley's separate no-spark tests focus on coil power, ground, sensor and module. A no-spark complaint deserves that full factory ignition test sequence, not only a new switch.
The cautious way to test it
This is a functional diagnosis, not a substitute for the exact year's service procedure. No universal switch threshold is given here because the opened FXR ignition book does not state one. Values copied from another model, aftermarket replacement kit or tuning setup may be different.
- Identify the system. Stock civilian, stock police or aftermarket? Normal VOES input or a mode that reassigns it to nitrous/turbo retard?
- Trace the correct hose and wires. Look for cracks, collapse, heat damage, kinks, bad connectors and bad ground. Harley 99948-92 specifically calls out the FXR transmission-to-frame ground strap in its ignition checks.
- Shut it down for continuity work. In 99948-92, Ignition System page 6, Harley says: "If a resistance test is performed on a 'live' circuit, the multimeter will be damaged. Turn off the ignition and disconnect the battery before conducting a resistance test." Page 7 also calls for the module/sensor connectors to be unplugged.
- Bench-check the isolated switch with the proper vacuum setup and meter. Watch for state change as you apply and release vacuum. The switching threshold must match the exact-year/model service specification, not a universal forum number. The meter tests continuity; it does not establish engine timing.
- Separate hose faults from switch faults. Test the hose path too. Restore the port cap or connection specified by the carburetor maker. The Mikuni HSR diagram marks its vacuum fitting "To V.O.E.S. or vacuum petcock. Cap-off if not used." An open intake port is an air leak, not a bypass.
- Confirm timing with the correct instructions. Harley's static/dynamic timing procedure or your aftermarket ignition's own sequence comes after the wiring and hose are known good. Normally, an absent signal simply leaves a low-vacuum schedule; a grounded one selects a more advanced schedule in stock normal logic.
- Do not touch a spark circuit casually. The OEM troubleshooting guide contains high-voltage spark tests. This article deliberately does not turn those into a home test. A competent technician should handle live ignition testing or unfamiliar timing work.
For an ECU/MAP-equipped conversion, use the manufacturer's sensor calibration and map checks rather than a stock switch test. A simple vacuum/continuity test cannot validate a custom map's detonation margin.
Should you keep it, bypass it or replace it?
| Setup | Keep VOES? | Why | Tradeoff |
|---|---|---|---|
| Stock or mild street FXR | Usually yes | Retains light-load timing and original module logic | A replacement switch and hose may be needed; part cost and stock vary |
| Proper single-fire street conversion | Usually yes, if supported | Independent-cylinder spark and load-sensitive timing can coexist | Needs correct compatible module, twin/two-coil setup and wiring |
| Racing or unusual very-low-vacuum cam build | Tune deliberately | A fixed curve or different threshold may suit the specific engine | Fixed advance can lose economy or reduce knock margin in another use |
| Standalone programmable ECU/MAP system | Follow its map design | Pressure mapping can replace a two-state input | More complexity, cost and configuration responsibility |
| Unknown wires on an inherited FXR | Do not guess | Determine which lead and state the installed module expects | A neat harness with the wrong curve state is worse than an ugly stock harness |
The old switch is an inexpensive concept, even if the OEM part's availability changes. Its virtues are simplicity, low electrical demand and no need for a laptop. Its limitation is just as real: two vacuum states cannot represent every engine, cam, elevation and load combination.
A well-configured MAP-based system can do much more. A disconnected stock input cannot. And a single-fire conversion may be worth doing for ignition-event reasons, but "we went single-fire" is not a valid reason by itself to abandon load information.
FXR Archive | Tech | November 2026